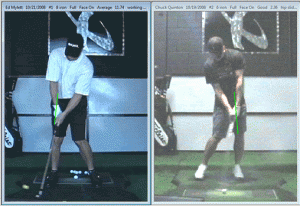
I was giving a lesson to a student and good friend, Ed Mylett, yesterday and it was very timely that I had just put out the video on the bump transition because that is exactly what we worked on in his swing. In the screen capture below you will see his swing on the left on mine on the right. The green line represents the outside of our lead leg thigh and hip at address. As you can see in the Ed’s swing, he hasn’t fully gotten onto his left side as indicated by the green line. Your belt buckle should be on or very close to that green line by impact.
Now, it’s very important to note that Ed is a Rotary Hitter and this swing of mine is also a Rotary Hitter pattern. The reason this is important is because it is this move that brings the club, arms and hands all the way down to hip level. In one of the original Rotary Hitter videos I talked about the throwing motion from the top with the right hand for righties. While this is absolutely correct, I’ve seen several students who are doing this without ever clearing their bodies out of the way. This simply creates an armsy swing with minimal consistency. If you watch the “Rotary Hitter Downswing” video you will see a clip of my swing at the bottom of that page and if you pay close attention you can see just how hard my hips are working to clear to make room for the arms to come through. Sequencing is extremely important in the Rotary Hitter swing motion and it is absolutely paramount that the legs be allowed to bring the club down to the hitting area. If you’re using your legs and hips properly, it will happen fast enough that you still feel like you are throwing from the top, but if you don’t master the clearing of the hips and still throw, you’ll simply come in too steep.
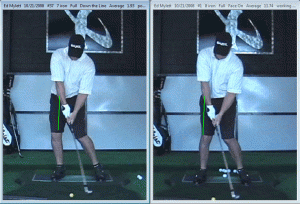
Now, take a look at the two video captures of Ed’s swing below:
In the photo on the left, you can see just how much more of a powerful position Ed is in after we worked on his swing. He’s much closer to being in the proper position than the swing in the right that was our baseline swing of the day. He’s now able to feel his arms being pulled down more by his big, powerful hip and leg muscles and save his arms until later in the swing. This sequencing motion will give Ed a lot of effortless powerful. Stay tuned for more progress on Ed’s swing because we’re going all the way to scratch golf!
Chuck Quinton


Ed looks to have the same problem we all do I mean I feel like I am looking at myself there with his pic on the right. So what was the feeling, tip, or drill that finally gave Ed the “a ha”? I understand this is such a dynamic move and it may be hard to articulate but I was hoping there was something specific or did Ed just hit it and felt it?
There were a few things. We had to make a setup change for starters, but the main key was having his arms feel like they did nothing at all in the downswing, that it was all powered by the legs. To help with the leg motion, we had him feel that he was moving his hips not just laterally, but also feeling them move at a 45* angle away from the target line. This helped him continue to clear and eventually post up once his hands reached about belt high.