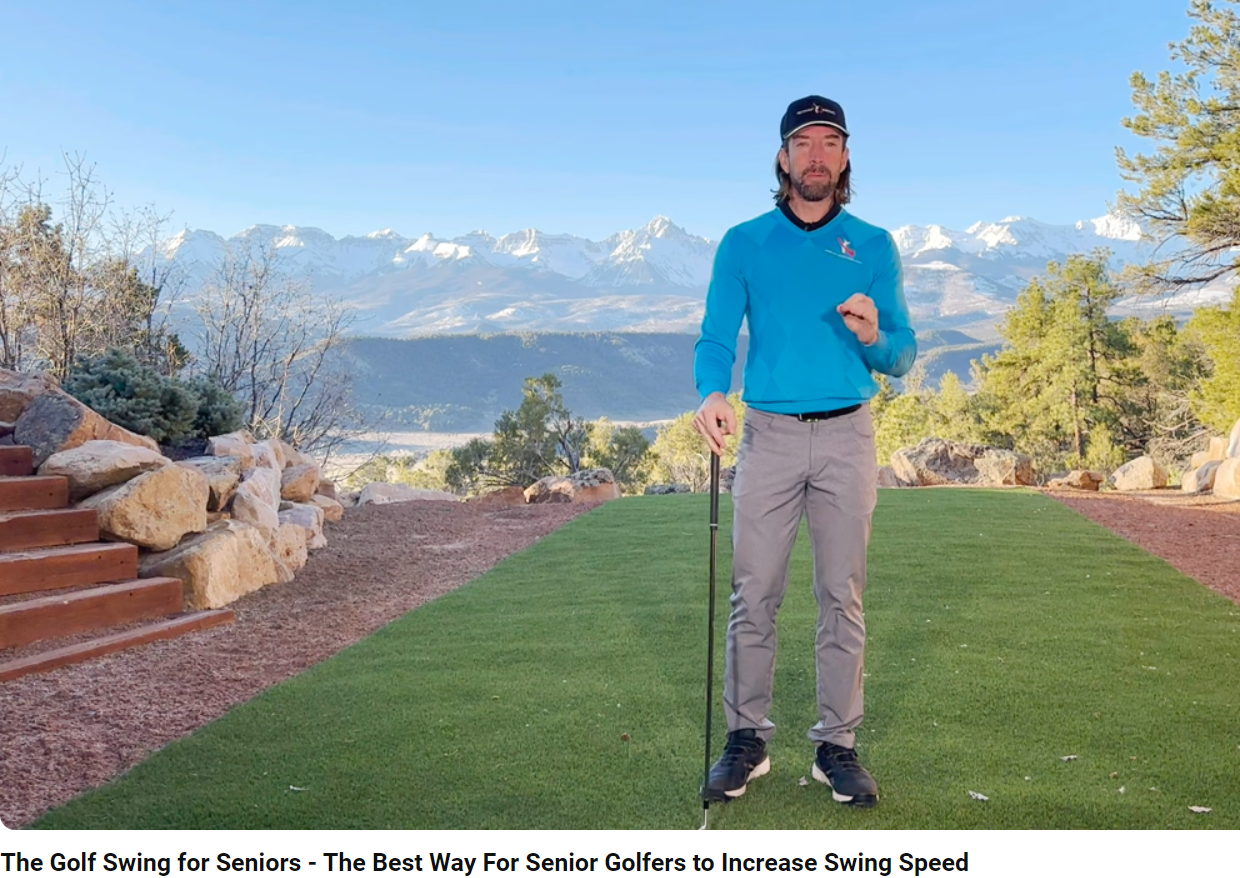
The golf swing for seniors is a little bit different than it was when you were younger. The fact is, there can be a good amount of decrease in clubhead speed and power as we get up in age. If you’re senior and you’ve noticed this kind of a drop off, the reason isn’t quite what you think it might be. In almost all cases, the decrease in clubhead speed isn’t because you’re older, it’s because you never released the club the right way to begin with. Most golfers tell me they never really did hit it as far as they “felt” that they should have….and they’re right. The biggest reason I see for lack of speed, especially in the golf swing for seniors is they never were releasing the club properly!
Seniors Lose Swing Speed As They Get Older
Everyone has hit a shot or two where the ball just exploded off the clubface. The problem is it was always difficult to replicate it and most never even realized why those shots were so good. The “magic” lies in the WAY you release the club. Especially in a golf swing for seniors! The release of your wrists properly is where two-thirds of your clubhead speed comes from. The speed you once had when you were younger came from just that…..you were younger. You could rotate faster and because most people try and get their speed from rotation instead of the release, as they get older it naturally slows down!
Now here’s the good news. Because you never learned to release the club properly, there’s a VERY good chance that you can actually hit it further as a senior than you did when you were younger. The problem most people run in to is that what feels like power, or how you feel you’re generating power, really isn’t powerful at all. What feels like power and truly IS power are two completely different things. Most golfers start to see a drop off in distance around the age of 50. Due to the fact they’re not as flexible anymore, the clubhead speed they were able to generate drops. So while it still may feel like you’re generating power, in reality you’re not. That’s why it’s so important that you understand the difference in body rotation and the speed you get from releasing the club properly.
You’d be amazed at how quickly you can pick up some extra yardage, especially when it comes to the golf swing for seniors simply from the release. Players like Bobby Jones, Tiger Woods, Jack Nicklaus and more were all masters of getting into the proper release position. The good news is you can get there too and as a senior golfer, there’s nothing better than being the one who still has the distance they had when they were younger! Want more info on swing speed? Here’s some information on how to swing a driver in golf that will help you out!
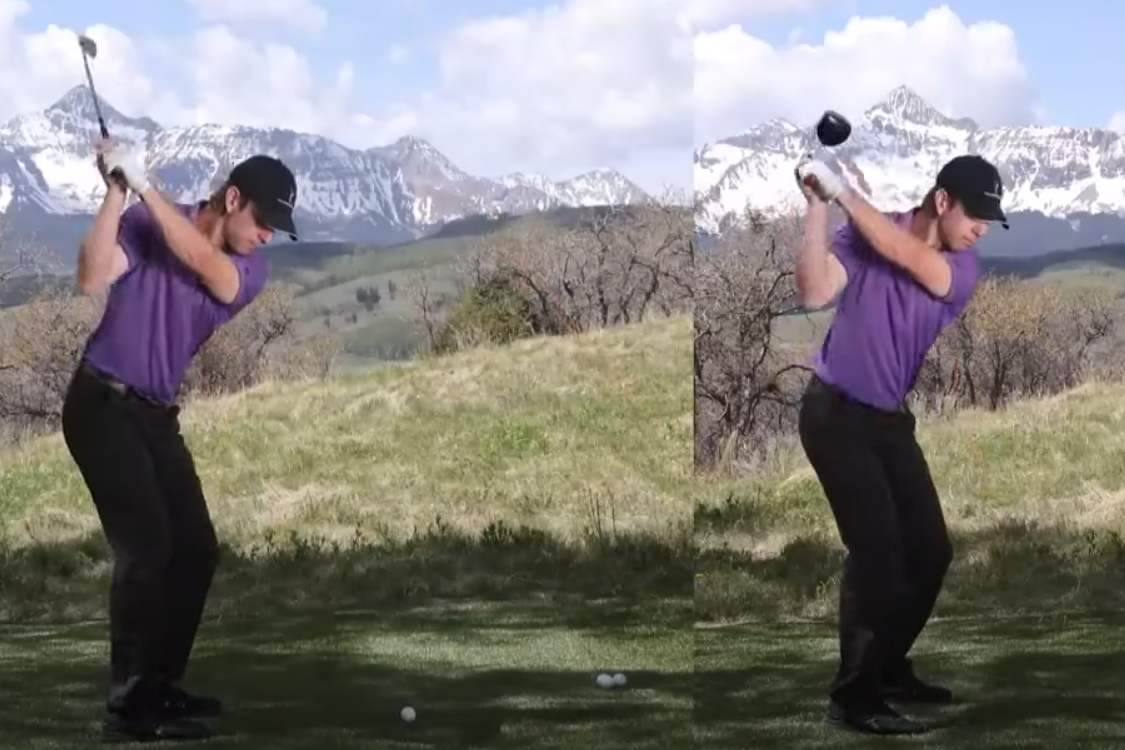
If you’ve been around instruction for more than 10 minutes, you’re going to get asked what’s the best way to learn how to swing a driver in golf. Not only how to swing a driver but what’s the difference in an iron swing and a driver swing. The answer is honestly, not a thing! There’s literally nothing you need to do that’s different. You actually want to try and swing the driver in the same way you’d swing an 8 iron. Of course the driver is a different club and there’s subtle changes. But those are in your setup more than anything else.
When you go to swing a driver in golf, you’re going to hit it higher up on the club face simply because it’s set up on a tee. But the actual swing itself does NOT change. You don’t want it to change. Really the only other change you’re going to make is moving the ball up in your stance and a little bit inside the target line. Other than that, is there anything you need to do differently? Nope! The entire “trick” of learning how to swing a driver verses how to swing an iron is learning what you have to do to get them to FEEL like the exact same speed.
How To Swing A Driver In Golf VS An Iron Swing
By default, the driver is your longest club in the bag. For every extra 1/2 inch a club has in length, you’re picking up about two miles per hour of swing speed. This is why you’ll find that your clubs usually vary by a half inch as you go up from pitching wedge. Now, obviously you have different lofts on the clubs, but if each club had the same loft and only varied the length of the shaft, you’d hit he longer shafted clubs further. Take the difference in your 8 iron and your driver. If your driver is a foot longer than your 8 iron, that means an extra 24 MPH by default.
Now some of you may be thinking that this isn’t adding up. You’ve been on swing speed monitors and you swing your 7 iron at 80 and your driver at 86. Where’s the extra 24 MPH? Why? Simple! You’ve got a habit of thinking when your driver is in your hand that you need to swing it like you need to kill it. Wrong! It’s the fact you’re trying to crush it that’s slowing you down! When you swing a driver in golf, you want to swing it the same way you’re swinging your 8 iron. You’re not trying to kill an 8 iron are you? Of course not! That’s why sometimes when you’re really smooth, you can crush one and you don’t know how you did it.
The trick is to learn how to properly sequence the swing so it can come back down naturally. In other words, without you trying to crush it from the top. Try and feel the exact same body speed no matter if it’s the iron or the driver. You’ll obviously have days where everything is just lining up perfectly. Those are the days you can really try to go after if you want to. But in a normal round, you want to try and keep the feelings of all your clubs the same. So what’s the difference in how to swing a driver in golf vs how to swing an iron? There isn’t any!
One of the easiest ways to drop strokes off your golf game is through improving your chipping. The average 85 shooter is faced with 13 chips, pitches and putts per round. The quickest way to break into the 70’s is to improve your chipping distance control and improve your up and down percentage.
Distance control is the most important aspect of chipping. Think back to the last time you were faced with a difficult chip and did not get the desired result. Maybe you left the ball 15 feet away from the hole.
I would bet that you did not miss the chip 15 feet to the right or to the left. Most likely you were short or long of the hole. That is why controlling distance is so crucial. That is where we all have the most room for improvement, and where we can drop strokes the fastest.
Take the Test
Grab 10 golf balls and head to the practice green. Pick a shot roughly 50 feet from the hole on a fairly level lie. Hit 10 shots to the hole and map out your shots. You might find them to look something like this.
Notice how most balls miss short and long, but the direction of the shots are consistent.
You will notice that most of the balls that are farthest from the hole are both short and long. The distance the balls missed from left to right was insignificant.
If the speed was perfect on each shot, most of the remaining putts would be less than 2 feet.
How to Improve
We have a great drill to help you hone in on your chipping distance control. The “Ladder Drill” will have you chipping closer than ever in just a few practice sessions.
The key is to constantly observe the distance you hit each shot and adjust. Having a set target for the maximum distance of each shot is important to get the proper feedback as you practice your chipping.
To watch the “Ladder Drill” video click here. Or for more information on how to perfect your golf swing, visit www.RotarySwing.com for over 2 ½ hours of free instruction.
Have you ever been told you are too handsy when chipping?
Maybe you are flipping the club through impact? Have you been hitting your chips fat and thin?
You have most likely been given bad advice by a teaching professional, or playing partner that is leading to higher scores around the green.
In the last couple of videos we learned how having the proper setup and technique can help you shave strokes off your game from around the green.
Now you can learn how using a device that you most likely already have can make these moves seem simpler than ever.
The Rotary Connect!
I see people everyday give up strokes by using the improper chipping motion. The Rotary Connect will help you to use your arms and body as a unit and get rid of your flip forever.
The chipping backswing and full shot backswing are very similar. An easy mistake to make is to bend the right arm too early and over hinge the right wrist. This brings the club back too far to the inside and can lead to a lot of inconsistency.
With the Rotary Connect you can cure this by keeping some pressure on the inside of the cuff during the backswing. This forces you to get a better shoulder turn and less arm action, resulting in a much more consistent stroke.
What about flipping? Well when you flip or “chicken wing” after impact your left arm is folding. With the Rotary connect securely fastened to your arms this will feel very unnatural. By keeping some pressure on the cuff with your left arm in the follow through you will eliminate your flip forever.
In fact it was just the other day I was working with a student that had a similar problem He was bending his right arm very early in the backswing, causing the club to go too far inside.
From there he was forced to get over active with the right wrist and flip through impact.
With just a few minutes training with the Rotary Connect his backswing position was much improved and the flip had all but disappeared.
So you can say goodbye to those thin and heavy shots, and look forward to winning a lot more money off your friends.
If you want to see the full video of how the Rotary Connect can make chipping simpler than you ever thought possible click here!
You see the tour pros hit these low-flying shots that look like they’re about to fly over the green. Then, they hit and slam on the brakes, and the ball spins backwards!
HOW DO YOU HIT THE SPINNING CHIP SHOT?
Learning how to hit shots that fly low and spin a lot is a matter of technique. Understanding the factors that influence spin are critical, so let’s start there.
First, you have to understand that spin is primarily dictated by loft, NOT SPEED.
To understand this further, try chipping with your driver. It likely has around 50 degrees less loft than your wedge and, no matter how hard you hit it, it won’t spin more than your lob wedge.
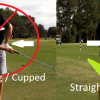
Most golfers are taught to set up for a chip by DELOFTING their wedge to help them avoid hitting it fat, when in fact, this typically results in the exact opposite!
Take a look at the two setups below and try and figure out which pitch shot will spin more:
If you guessed the one on the left, then you’re heading in the right direction! Even though most golf instructors teach the setup on the right, it reduces the ability to spin the ball by 30% as you can read in this chipping article here.
Needless to say, you’re setting yourself up for failure if you want to spin the ball a lot from a short distance by setting up with a lot of shaft lean.
The second problem this setup causes is hitting the ball fat.
As you can see in the image below, when you setup with the ball back in your stance you will significantly alter your angle of attack.
With a negative 18 degree angle of attack, there is no bounce left on the wedge to avoid digging into the turf, so if the leading edge hits the ground before the club face hits the ball, you’re in trouble. This is the exact recipe for laying the sod over the ball.
This is best illustrated in the following videos:
These videos clearly show how steeply the golf club will approach the ball on a pitch shot with this type of setup, putting you at risk for chunking your chips. Learning how to use the bounce is the key!
If you want to learn how to become a great chipper very quickly, you need the 7-part RotarySwing.com “Golf Chipping How-To Guide,” which is only available to Premium Members.
Click the button below to find out everything you get with a Premium Membership.
We all know that one player who we don’t want to play against when the stakes are high. It seems as though whenever it means the most, they always make it happen.
If it’s a crucial drive down a tight par four, you know their ball will find the fairway. If it’s a 6 footer to win the match, you might as well walk to the cart because it’s going in.
Their incredible focus makes you think they’ll hole every big putt and never miss a shot.
Every golfer dreams of becoming this player. We’ve all thought of how cool it would be to be known as “the Iceman” at our local club.
The truth of the matter is that any one of us can be this player. Like the rest of your golf game, it all comes down to how you practice. Having the proper pre-shot routine may be one of the most important factors in becoming your clubs “go to” guy.
Golf is just like anything else. You perform how you prepare to perform.
If you’re unorganized, unstructured, and have a very lax practice routine, it will show under pressure.
Notice how great pressure players like Tiger Woods and Jack Nicklaus seem exactly the same whether it’s the first hole of a four day tournament or the last hole to win the masters. Their walk, pace, and especially pre-shot routine never waver.
Tiger stays focused by always using the same pre-shot routine.
Building a great pre-shot routine is all about simplicity. It should not be complicated or overly lengthy. Keep it short and sweet.
I recommend standing behind the ball and taking one practice swing. As you’re taking this practice swing, you want to be visualizing the type of shot that you’ll be playing.
After your practice swing, take a deep breath from behind the ball and play the shot in your mind’s eye, seeing the entire flight of the ball.
Next, you want to address the ball, placing the club behind the ball first, and then use whatever system you have developed to get yourself properly aligned. Take one more look at your target and pull the trigger. It’s that simple.
Justin Rose is visualizing his shot here.
Most people get into trouble by ditching their pre-shot routine when the stakes get high.
They often rush through their routine, not taking the proper amount of time to visualize the shot. Even worse, they sometimes take twice as much time and extra practice swings, allowing time for negative thoughts to envelope their mind.
The key is to practice just as you will perform. Develop a simple and effective pre-shot routine and have it exactly the same for every shot, for the rest of your career.
Sticking to your routine will give you comfort in familiarity, and help to clear your mind of unneeded thoughts. Become a master of consistency and you’ll be collecting more checks than you’re writing in your weekend game.
In order to be a GREAT ball striker, you need to be able to do all of these. That’s where there seems to be a large void in golf instruction.
There is plenty of information on where and how to position your hands, how to grip the golf club, and even where to point your toes.
But when it comes down to actually working the ball and controlling your shot shape, there is little to no information.
Here is a great drill to introduce to you “shot shaping 101″:
The first piece of controlling your shot shape is strictly directional. Can we get the ball to start to the right, and can we get the ball to start to the left?
First, you should not be worried about how far the ball starts to the right or the left. With experience and some practice, this will come. This article and its accompanying drill are designed to help you decide the perfect starting line for any shot.
Tour Sticks are perfect for this drill.
The only equipment you will need are two golf alignment rods. These are graphite sticks that are slightly sharpened on one end so that they can be placed into the ground at whatever angle you’d like.
We will need two of these: One for your feet alignment and one as your shot shaping guide.
(Tour Sticks are the perfect alignment rods, and you can get them from our golf training aids store.)
Now that you’ve got your alignment rods, here’s how to set up your training station:
Pick the target in the distance while on the driving range.
Place a practice ball in the spot you’ll be hitting your shots.
Now place your first alignment rod between the ball that will be hit and your feet. Point this rod toward the target in the distance. This will give you a frame of reference to help you line your feet parallel to the target.
Now take your second rod and place it six or seven feet in front of the ball to be struck, directly in line with your target. If placed properly, a dead straight shot toward the target will hit this rod.
Now it’s time for the fun part!
For the sake of this article, we will assume that there are two types of shots: shots that start to the right and shots that start to the left.
As mentioned before, we will not get into the details of how much to start the ball to the left or the right in this initial drill. The first shot we will practice will start to the left.
To start a shot to the left of your target line, focus on the club head moving from right to left of the target line, if looking from the down-the-line view.
Ideally, you would like to have the face pointing the same direction the club is moving. Having the face slightly open or closed is fine for now and will only produce a slight fade or draw.
The goal is only to start the ball to the left of the stick placed in front of your ball.
To start a ball to the right, we will make the opposite motion. We now want to swing from left to right through the ball (if looking from down the target line).
The more your club is moving toward the right, the farther it will start to the right of the alignment stick, all else equal.
So let’s get started with the drill.
I would like for you to set up with your feet parallel to the alignment rod on the ground.
Be sure you do not cheat and open or close your stance in order to start the ball to the left or right. Your feet, hips, and shoulders should all be aligned toward the target.
Now I want you to practice swinging to the left, so that when you contact the ball it will start left of the target stick and miss the alignment rod that you have stuck in the ground. I want you to practice the shot until you hit one that misses the stick to the left.
Once you have done this, you’re going to switch to a shot that starts to the right of the target stick. It’s important to switch after every shot. This helps to re-create an on course scenario where every shot is different than the one before.
Keep your feet in the same alignment and hit a shot that starts to the right of the target stick. Keep practicing until you hit a shot that starts to the right and misses the stick.
Continue to practice these drills, alternating from one shot shape to the next. Once you have successfully started 10 balls to the right of your target stick and 10 balls to the left of your target stick, you have completed the drill.
Now you understand how to control the starting line of any golf shot. You will have taken the first step toward becoming a great ball striker.
Check back on our blog for future articles on how to continually improve your ball striking. In the future, we will go over not only the starting line, but curvature of the ball as it flies through the air.
We will also provide you with great drills on trajectory control and advanced shot shaping techniques.
With today’s launch monitor technology, understanding the mechanics of what creates a particular ball flight such as a high draw or low fade isn’t an art anymore – it’s a science. No longer should you be puzzled about how your favorite PGA Tour pro hits that high, subtle draw, you can learn exactly how it’s done and how to do it yourself.
Learn how to hit a draw
Rory Mcilroy has made the high draw bombing 3 wood famous this year after hitting a tee shot over 370 yards with his three wood at Wachovia in 2012. That’s a LONG three wood! How did he do it?
More importantly, how can YOU learn to hit a huge drawing 3 wood?
The first thing you have to understand is that if you want to hit the big push draw that Mcilroy hits, you have to a particular swing path and plane. This particular swing plane allows you to approach the golf ball from the inside and with a shallower angle of attack.
The shallow angle of attack is critical to launch the golf ball higher and get it carry further. Once you put these two pieces into place, you’re ready to start bombing your 3 wood!
Here’s a great article about a golf tip from Golf Digest where Butch Harmon gives the age old advise of playing the ball back in your stance for hitting chip shots from tight lies. Dave Pelz is another golf instructor who teaches this method, but has this method gone “old-school”?
Today’s golf instruction is way more advanced than it was even 10 years ago. The use of high speed cameras, high tech computers and launch monitors has changed our understanding of the game – even in chipping. With today’s launch monitors like the Flight Scope X2, we can see how much spin even a chip shot has!
However, even with this much understanding of the mechanics of the golf swing now, many golf instructors seem to be stuck in their ways. They refuse to change their instruction methods even in the face of overwhelming scientific evidence. However, in the case of this chipping tip from Butch Harmon, you don’t need a launch monitor to figure out why this is bad advice.
For most golfers, it’s not easy. But, the reality is that increasing lag in can be done in just a few minutes when you understand the mechanics of what you’re trying to achieve. The problem for most amateur golfers is that they “spin” their shoulders from the top of the backswing. This creates a lot of centrifugal force that creates a “throw out” motion on the club. This simple move is one of the most costly in the golf swing.
The secret to creating lag is keep the shoulders quiet during the downswing so that the arms can work back down in front of the body while maintaining the lag. In the image below, you can see one of my students doing this and he increased his lag by 18 degrees in less than 10 minutes.
Increase lag in 10 minutes.
This increase in lag creating a dramatic improvement in his impact position and created a very penetrating ball flight. No longer was he hitting a high, weak, spinny ball. Instead, he started hitting shots that bored through the wind with a great “hiss” sound and all it took was learning how to use his right arm properly.
Below, is a video clip where I talk about how we dramatically increased his lag:
For most golfers, hitting a 3 wood off the fairway is a scary proposition! But the reality is that hitting a fairway wood is no different than any other club in the bag except for the driver – and even that is debatable.
The key to solid fairway wood strikes is to HIT DOWN on the ball exactly as you would an iron.
Also note the ball position – it’s in the same place I would hit a pitching wedge. Most people don’t understand ball position, so let’s talk about it. How to hit 3 wood off the deck.
Ball position can vary from shot to shot if you want to alter the shape or trajectory. BUT for a stock shot, the ball should always be in the same place from front to back.
That’s because, all things considered equal, the bottom of the divot ideally will always bottom out at the widest point in the downswing, which is a line straight down from the middle of the left shoulder socket for right handed golfers.
Now, you can easily alter this position through any number of movements, but if you have a natural release of the club – ie. you’re not casting, flipping, etc. – and you have good swing mechanics, the divot will bottom out here every time.
When I do my RST golf clinics, this is one of the key fundamentals I demonstrate to my students.
I start swinging the club back and forth with my left arm only. Without fail, my divot bottoms out in exactly the same place every single time as long as I don’t alter it.
Think of it as a grandfather clock and a pendulum. Your left shoulder is the pivot point, and the club is the pendulum. As long as the pivot point is fixed in space, the club bottoms out in the same place, and solid contact is a certainty.
Now, it should be said that the right arm coming onto the club to take its grip can and does move the bottom of the arc back slightly as the the two pivot points counter balance each other, but if you properly release the club with the right hand, the amount is not overly significant.
So, long story short, if you want to start smashing 3 woods off the deck and start reaching those long par 5s in two, you need hit down on the ball to ensure solid contact, and you need to put the ball in the proper position.
Jim Furyk, by all accounts, has had a great season this year on the PGA Tour. Unfortunately, it’s marred by his blowing the lead at the 2012 US Open and on the final hole against Matt Kuchar at Firestone. Now, once again, Furyk is in the lead at the Tour Championship and everyone must be asking themselve, “Will it happen again?”
No one likes to see collapses like Furyk’s and Adam Scott’s at the Open Championship, but it is a natural part of sports. You can’t have the good without the bad along the way. I, for one, wish Furyk the best and hope he closes the deal this week. I also hope that mentally he can push those demons aside and move forward confidently. It won’t be easy having two heart breaking defeats in recent memory. I do fear that if it comes down to the 18th hole again like it did a few weeks ago, that we may have to witness an even bigger collapse than the previous two because this one could be worth $10 million bucks and the Tour Championship!
A lot of people knock Furyk’s swing, and it is definitely not pretty or something myself, or anyone else for that matter, would ever teach a student. However, one thing should be taken from Jim Furyk’s swing this week – he has one of the most square paths through the hitting area of any PGA Tour player. TrackMan has measured his path as close to 0.0 degrees square and that’s one of the main reasons the Furyk is still on the Tour. He’s not a great putter, his short game is lacking, but if you have a square path, lots of good things can happen.
My name is Chad Beuoy. I am the PGA Director of Instruction at the Montecito Country Club in beautiful Santa Barbara, California, and the newest Rotary Swing Tour Certified Instructor.
Regardless of your skill level, if you are serious about improving your game, I would love the opportunity to help you take your game to the next level.
Take golf lessons with Chad Beuoy, our newest RST Certified Instructor.
I have put together some discounted packages as a special offer to RST Members ONLY!
THE BENEFITS OF AN IN-PERSON LESSON WITH AN RST INSTRUCTOR ARE INVALUABLE AND WILL EXPEDITE THE LEARNING PROCESS!
IN-PERSON OPTIONS:
Series of (6) One Hour Lessons $500 ($600.00 Value)
Series of (12) One Hour Lessons $1,000 ($1,200.00 Value)
**MUST SIGN UP BY 11/1/2012**
ONLINE OPTIONS:
Series of (6) Online Lessons $300 ($360.00 Value)
Series of (12) Online Lessons $600 ($720.00 Value)
**MUST SIGN UP BY 11/1/2012**
*Please click the link below to contact me for instructions on signing up:
The golf swing is one of the most complex athletic movements in all of sports. As a golf instructor, it is not only my job to simplify this movement for you, but to make sure that you are performing it in the safest and most powerful way possible.
I believe there is only one safe and powerful way to swing the golf club, based on the anatomical absolutes of the body and scientific evidence, not my personal opinions about what a golf swing should look like.
During our lesson, I will use the latest in video analysis to quickly identify the swing characteristics that need improvement and then create a plan to help you implement these changes.
At the end of each lesson, you will receive a summary with a list of the drills you should work on. These summaries will be viewable at any time via your own personal swing locker within my online academy and, if you own an iPhone or Android phone, I will also forward these summaries via text message so that you can take them to the range for reference.
BACKGROUND IN GOLF:
My grandfather introduced me to the game at age 9, but it was not until age 12 that I fell in love with the game. I began playing competitively as a freshman at Dos Pueblos High School and also took part in many junior events around Southern California.
I started my career in the golf business as an Assistant Professional at Twin Lakes Golf Course in Santa Barbara, California, in 1998. I received my Class A PGA Membership in July of 2005, graduating from the PGA of America’s Professional Golf Management Program.
My years of experience in all areas of the golf business have led me to my true love and passion, which is teaching people the game.
RESUMÉ:
Senior Instructor – The Studio at Twin Lakes, Santa Barbara, California
First Assistant Golf Professional & Teaching Professional – The La Cumbre Country Club, Santa Barbara, California
Head Golf Professional – Rancho San Marcos Golf Course, Santa Barbara, California
First Assistant Golf Professional & Tournament Director – The Presidio Golf Club, San Francisco, California
First Assistant Golf Professional & Merchandiser – The Montecito Country Club, Santa Barbara, California
PROFESSIONAL CERTIFICATIONS:
RST Level 1 Certified Instructor
TPI Level 1 Certified Golf Fitness Instructor
*Please click the link below to contact me for instructions on signing up:
I’m Chuck Quinton, and on June 11, 2011, I almost died.
Over the course of the next few days, I almost died 3 more times.
It’s amazing how quickly life can change. One instant all is well, the next you’re laying in the ER and overhear, “Bed 19 is going to need a neuro consult. He broke C1 in three places.”
My first thought was, “Oh man, poor bastard!” Then, as I watched my wife’s face completely drain of blood and turn pale white, my next thought was, “Oh f#&k, what bed am I in again?”
How I used to spend my days snowboarding.
Life was going very well for me on June 11, 2011. It was opening day at the Valmont Bike Park in Boulder, CO.
I had spent my last few summers in Colorado; originally as the Teaching and Playing Professional at Castle Pines Golf Club, and later as a competitive downhill mountain biker. But once I heard about Valmont, I knew I had to move there for the summer so I could practice my 360′s and backflips on my mountain bike every day.
Now, you may ask yourself, “Why the hell is a former professional golfer and well known golf instructor risking his life mountain biking?”
The simple answer is, there’s more to life than golf, and I was a professional snowboard mountaineer long before I was ever a pro golfer. I’ve always had a penchant for thrill seeking, and my love for mountain biking knew no rival.
But things change…
I had been waiting for opening day at Valmont literally for months. I couldn’t wait to launch over the huge wooden and dirt jumps.
I had stopped playing professional golf in 2009 after a busy summer teaching at Castle Pines because I simply got burnt out. Teaching and playing every day while throwing in a few tournaments here and there had taken their toll on me mentally, and I needed a change of pace.
Getting back into competitive mountain biking was the perfect escape, and I started racing downhill in 2010. My last two races of the season I placed 1st and 4th, and so when the 2011 season was ready to start, I was fired up to whoop some ass. I could hardly contain myself.
And then it happened…
Me one week before the “accident,” jumping a 21 foot gap on my downhill bike.
Opening day at Valmont was a big affair. Hundreds of people were there, and thankfully, so were the paramedics.
Valmont is a “big boy” freeride style park with wooden and dirt jumps nearly 10 feet tall, so the chances of getting hurt are pretty high. But the chances of having fun are even higher.
I got there early that morning and was riding all the lines, which range from Small to Large, by mid-morning.
My first run on one of the XL lines was also my last.
Having hit some big jumps and feeling comfortable, I worked over to an XL line that had a good sized drop with a 10 foot gap that then ran into another jump with two gaps.
As I came off the first drop, I was cruising with some serious speed. So much so, that I felt I was going to overshoot the next gap and fly into the face of the next jump.
I started to scrub speed as I approached the gap and then as I left the lip of the jump, I “Bubba Scrubbed” the lip to avoid going too far. Unfortunately, I misjudged my speed, came up short and landed head first onto the wooden jump.
This is the drop I went off just before the gap where I crashed.
I’ve wrecked HARD literally hundreds of times on my mountain bikes over the past 20 years of riding. This one was nothing spectacular.
As I gathered myself off the ground, I did my usual “inventory check” – toes still work, legs still work, arms are good, SHIT, I broke my hand…. I could see a huge lump through the glove on my left hand and immediately knew it was broken.
This was a major bummer because I was supposed to be going to Whistler Canada in two weeks. Whistler is like mountain biking nirvana, and I was devastated knowing that I might not be able to ride.
As I stood there lamenting over my broken pinky bone, the paramedics had arrived and were trying to get me to sit down and started asking a bunch of annoying questions.
“What day is it? Do you know where you are? What’s your name?”
“I’m at Valmont, and it’s opening day, man! Look, I broke my hand and may not be able to go to Whistler now!”
The picture I posted of my hand from the back of the ambulance.
For some reason, the paramedics didn’t seem to care much about my hand and kept asking me the same annoying questions over and over. After about 5 minutes of this, I started to realize that I was having a more difficult time focusing on what they were saying, and that caused me a little alarm.
I’ve been injured countless times over the years, so dealing with “mental check” questions is nothing new. But once I started “zoning out” a bit, I thought I better take some precautions.
So, I let the paramedics know I knew what they were doing but that I was having a harder time focusing on their questions and that I felt I “had rung my bell pretty good.”
My helmet was cracked, but I had broken three helmets over the past year and was little worse for the wear, so I didn’t give it much thought. I told the paramedics that I needed to go sit for a while. They wanted to get the stretcher and carry me down, but I insisted on walking.
“I’m no pussy, I can walk,” I told them.
As I walked down the side of the hill to the ambulance with a paramedic holding each of my arms, I was still really concerned about my left hand. Apart from not being able to go to Whistler in a couple weeks, I was STILL a golfer and instructor and the left hand is kind of important for controlling the club face!
So, as I sat in the ambulance waiting on my wife to bring the car around to take me to the hospital, I took a picture of my hand and posted it on Facebook to let my mountain biking buddies know what had happened.
Immediately, they started calling my wife, asking for details on the accident. She was in a panic. She’s seen me crash a LOT, but never seen me not just bounce back up and keep riding.
She tells my friends I’m sitting in the ambulance and that the paramedics are going to take me to the hospital. At this point, I’m still convinced I’m fine and my wife can take me as it’s only a few miles away, and I didn’t want her to freak out as I’ve NEVER taken an ambulance ride for anything.
But once she arrived with the car to pick me up, the paramedics had her convinced that I needed to be strapped down to a stretcher and put in a neck collar immediately and that they needed to drive me to the hospital.
“It’s no big deal, I just broke my hand and my head’s a little woozy,” I told them.
They weren’t buying it, and I could see the look on my wife’s face that I was going to lose this battle, so I let them strap me down and take me in the ambulance.
For the record, the ride in my wife’s X5 would have been much less painful. Do they not put suspension in those things?
From there, things went downhill – and not the fun kind of downhill.
Back to that poor bastard in bed 19…
I spent about 3 hours in the ER having X-Rays, CT scans, MRI’s, the works. After we overheard the ER doc say that I had broken my neck, he came into the room and told me that they needed to take me to ICU and keep me overnight.
My wife, who had just returned from puking in the bushes outside after hearing the bad news, looked terrified when he said ICU. So, I told her it’s no big deal, and I’m sure they do it for everyone just as a precaution, don’t worry about it. After all, my track record had proven that I was invincible, and I could handle just about any injury; sort of like Wolverine from X-Men.
The next morning I awoke to my “neuro consult”; some short, young looking dude in jeans and cowboy boots named Dr. Alex Mason. He told me I had broken C1 in five places, not three, and that I had two options:
I could wear a halo for 3 months due to the nature and instability of my fracture and possibly still need surgery at the end of the three months, or
I could do a C1-C2 fusion surgery now.
After consulting with good friend Dr. Brian McKeon, the team doctor for the Boston Celtics and member of the Rotary Swing Golf Medical Advisory Panel, we opted for surgery now.
At 6 am the next morning, I was wheeled into the OR to have 4 bolts and two titanium rods placed in my neck. I figured it would make me even more indestructible having some titanium bits, but there was one part that wasn’t completely clear to me when we were making the decision to have surgery – would I be able to play golf again?
To be honest, I was much more concerned as to when I could get back on my mountain bike as I was still burnt out on golf, but looking back a year later, this one moment was going to have a dramatic impact on the rest of my life that I didn’t realize until long after.
You see, the C1-C2 joint is where you get 50-60% of your rotation for your head, and they were about to bolt these two vertebrae together – permanently. I was clearly too high on morphine or whatever they were giving me at the time to realize that I was going to have a damn hard time hitting a golf ball if I could only turn my head half way.
How the hell would I even see the ball at the top of my swing? Spoiler alert – I wouldn’t.
Apparently, I wasn’t as invincible as I had thought because I bled out twice on the operating room table, requiring them to stop the surgery and give me more than two liters of blood to keep me alive.
Given that I could’ve died from the crash itself, as a large piece of broken vertebrae was perilously close to my spinal cord, and I stubbornly insisted on walking down the hill to the ambulance, and that I had now bled out twice from the trauma, you’d think things couldn’t get much worse.
You’d be wrong.
My neck after the surgery. Don’t worry, it’s worse than it looks!
Once I was stabilized and the surgery completed, they told my wife that we’d be able to go home in a couple days, and all would be well.
Not only did I not go home, I spent the next 9 days in the ICU with a 102+ fever.
Pulmonologists, cardiologists, infectious disease specialists. They all had their hands at trying to figure out what was wrong with me.
After 9 days, my fever finally broke and I was transferred to a regular room on the neuro floor. One of the doctors decided that I had suffered a blood clot but passed it, but didn’t think I would survive the “next one.” He suggested that my wife call any family that may want to see me in case I didn’t make it.
Strike four.
After 3 days in the ICU, the nationwide mortality rate goes up exponentially, statistically speaking. I had just survived 9 days and four near death experiences. I was ready to get the f#*k out of this place.
But I wasn’t done with my problems yet. I couldn’t swallow.
There was so much trauma and swelling that I literally couldn’t swallow any food, so they had to feed me through something called a “PICC line.” Basically, they put a tube into a vein in my chest to get nutrients directly into my blood stream.
After not being able to eat anything for a couple days, I was getting desperate to get some semblance of food in my mouth. I started bribing the orderlies to sneak me a popsicle. I offered one guy a thousand dollars if he could get me a root beer flavored popsicle – I wasn’t kidding.
Eventually, after 12 days in the hospital, I was sent home – and that’s where this story really begins.
You see, I’ve had two more surgeries since this one, but we’ll get back to those soon enough.
Now you have a brief little history of what has provoked this re-dedication to the one sport that has always tugged at my heart strings in a little different way than anything else.
Golf is addicting. Maddening. Enlightening.
But more importantly, golf is my life.
It always has been since I first picked up a club at 14 years of age. And it took this near death x4 experience for me to realize it.
Above is a video clip of my swing before the accident while I was the Instructor at Castle Pines Golf Club.
Ever since I first picked up a golf club, I’ve literally been obsessed with the mechanics of the swing. I’ve always been that person that HAD to understand HOW something worked.
I’m one of the most skeptical people you’ll ever meet, so someone telling me to do something with my golf swing “just because that’s the way it works” is far from being a satisfactory answer for me.
This compulsion to understand the HOW and WHY of how things worked is exactly what led to the development of the Rotary Swing Tour (RST) golf swing system – a swing based 100% on science, research and fact and nothing more, nothing less.
But what does that have to do with me breaking my neck? It’s this research into the biomechanics of the swing that has actually allowed me to return to golf and even play competitively again – pain free.
RST has been my life’s work and is my gift to the golf world.
My work has lead to thousands of golfers being able to hit the ball like they never dreamed, and do so effortlessly and devoid of pain because I used the help of Ph. D. Biomechanists from the US Olympics Committee and orthopedic surgeons from around the US to help me develop my swing system.
Anything I’ve ever had a question on regarding how the swing should be taught, I would ask them and get a medical reason for why it should or shouldn’t be done this way to prevent injury or pain.
Which has led me back to my own swing. A swing that has been admired by thousands but now must evolve once again.
If I’m ever to play golf again at a high level, I MUST follow the RST program exactly as I’ve laid it out, or I simply won’t be able to play. My injuries (we’ve only scratched the surface on those) are crippling, and I’m only 36 years old.
But that’s why my story is so important, that’s why I’m sharing it with the world for the first time.
My story is YOUR story.
No, maybe you didn’t break your neck, but if you’re like most golfers, you hurt after golf. You have aches and pains that keep you from fully enjoying the game that you love, that we all love.
And the truth of the matter is that it shouldn’t hurt! Golf is not a contact sport!
I’ve helped thousands of golfers over my 17 years of teaching completely rid themselves of golf-swing-related pain by teaching them the RST swing mechanics, and now it’s my turn to benefit from my research.
“But wait!” you might be thinking. “You founded RST; you developed it; don’t you already swing RST?”
Yes and no.
You see, I had some things in my swing that I used to squeak out a little more power here and there, like excessively fast body rotation (think Tiger Woods’ fast hips), that are simply not an option for me anymore.
My neck structure is permanently damaged, already arthritic, and the biomechanics of my spine are permanently changed. To make matters worse, I suffered nerve damage in the accident and lost 90% of the muscle mass of my infraspinatus, supraspinatus and teres minor on the left side.
To make a long story short, I have very limited use of my left arm in the way that it is commonly taught to use it in the golf swing. Bonus – using RST, I don’t need it!
If you’ll also remember, I severely broke the 5th metacarpal in my left hand, making it nearly impossible for me to control the club face with my left hand, as it has the strength of a two year old child.
A lot of people would pack it in, call it a day, say they’ve had a good run and pick up fishing. God knows that’s the direction my wife is pushing me in. But I hate fishing.
I NEED the challenge and competition that sports bring, and since it’s unsafe for me to mountain bike, snowboard, or do anything else I loved to do, I’m rededicating my life to playing golf at a high level.
Extra hardware in my neck. If I can play with this stuff in my neck, I can help you play with your injury!
Since my accident, I’ve played 7 rounds of golf.
My first round back was 8 months after my accident, in February 2012. I shot 81.
My longest drive was 240 yards, and I averaged about 230 off the tee. I used to hit it 340 yards off the tee with a drive of 408 yards as my longest ever!
Hitting it like this was a shocker, but I realized instantly that I missed this stupid f*%king game.
My next three rounds each got better. My fifth round of golf was the Colorado State Open Qualifier – LOL.
Yep, my fifth round of golf I decided to try and qualify for a professional golf tournament. Hey, if it’s not clear that my decision making process skills may be somewhat lacking at times, then you should re-read this article from the beginning.
Normally, I’d have been pissed, but instead, I had a sense of peace about this round. The qualifier was just over a year since my accident, and I had only played 4 rounds of golf over the past 13 months.
I had survived a terrible accident, hadn’t practiced hardly at all and was back playing golf at a professional level PAIN FREE.
Now, I’m not proud of a 75, but given the circumstances, it could’ve been a lot worse.
I couldn’t see the ball at the top of my swing, and I had lost 25 pounds of muscle since my accident. But after all this I was relatively competitive, and my neck didn’t bother me one bit.
Now, it’s hard for me to explain to you what it’s like to play golf after breaking your neck and not seeing the ball at the top of your backswing, but let me assure that it adds significant challenge to an already difficult game.
But I had overcome it, and if I could, so could anyone else. My RST swing mechanics allowed me to return to golf and play at a reasonable level, and they can do the same for you NO MATTER your injury or ailment.
There is NO WAY I would’ve been able to play golf with the way most golf instructors teach the swing today. The amount of aggressive body rotation puts a tremendous amount of shear force on the spine, and as you can imagine, that’s simply not an option for someone with a severe spine injury.
But maybe you don’t have an injury, just a sore back, or sore neck after a round of golf. I have neither.
In fact, I have no soreness whatsoever, and trust me, my body’s wrecked.
In fact, I’m going in for my FOURTH spine surgery in a year on Wednesday, September 5th, 2012. Apart from the problems with my neck, I was told at 31 years old that I needed to have my left hip replaced by an orthopedic surgeon.
Golf KILLED my hip to the point that I thought about quitting. Instead, I started delving into the biomechanics of the golf swing, and RST was born.
Today, I have no hip pain after golf and that doctor can shove it. My left hip feels just fine.
Quinton spine surgery #3. This one was just 2 weeks ago, and I’m already going in for another one!
RST swing mechanics have saved my game and my body, and they can save yours. They’ve saved thousands of golfers’ bodies already.
My golf instruction website, http://www.RotarySwing.com, has about 40,000 members, golfers like you and me, who don’t want to be sore after a round of golf anymore. Golfers who believe the golf swing should be effortless and enjoyable and should NEVER cause you any pain or soreness.
Well, I’m living proof that the RST golf swing is a completely safe and pain free, powerful way to swing the golf club, and I’m going to continue to prove it so that my story can help save the bodies of thousands more.
Over the coming months, I’m going to continue to blog about my return to golf.
I’ll talk in more detail about my injuries and how RST has allowed me to overcome every single one (did I mention my left shoulder has been dislocated more than 30 times?) and play completely pain free golf and still hit the ball 300 yards off the tee as I’ve been doing right up until this last surgery two weeks ago.
I’d still be playing right now if I didn’t have 13 staples in my neck.
I’m going to show you my swing as it looks today, and I’ll talk about the changes I’ve had to make because of my injuries so that they may help you with your swing and any injuries you may have suffered.
Join me in this journey. I don’t know where it will end.
Perhaps I’ll go back to playing some professional tournaments with a little encouragement from you guys.
Perhaps I’ll just enjoy the game and win my club championship again.
RST has given my body and mind a new lease on life, so I can enjoy the game we all love once again.
But more importantly, what will RST do for YOU and your body? What’s your story going to be?
I have literally thousands of testimonials on the website from golfers whose games have been transformed by RST.
Will you be next? There’s only one way to find out…
If you’ve got golf-swing-related pain, want to prevent golf-swing-related injuries in the future or just want to learn more about RST, visit my site at http://www.RotarySwing.com and get a FREE video membership to learn the basics of RST online and see what a biomechanically ideal swing can feel like.
Please note, if you’d like to discuss this blog, DON’T ask Christina questions over the phone. That is my wife, and she’s had to deal with this enough. You can discuss this post on our Facebook page here: http://www.facebook.com/pages/RotarySwingcom/208473937768.
Get Your Free Membership Below to Watch This Video Right Now!
Join our 53,837 members to watch this video and 25+ more!
You can make huge improvements in your golf swing today!
Want to learn the simplest way to take the club back? The takeaway in the golf swing has been taught a million different ways, but none simpler than this! Learning how to use the correct muscles will give you a PGA Tour caliber takeaway in 5 minutes and dramatically simplify your takeaway once and for all. Just read what others have said:
“After watching the free videos, I quickly realized the golf action Chuck is teaching is based on common sense fundamentals that most tour professionals use today. I also realized Chuck had a talent for explaining the golf swing in a way that makes sense.”