by Chuck Quinton


Differences in Swing Mechanics while Working Hitting a Fade and Draw |
Rotary Swing Golf |
Differences in the Swing
Working Ball Both Directions
by Chuck Quinton
When it comes to working the ball in either direction, there are
only a few changes that need to be made as I've made mention in the video
segments. But what are the actual exact differences? How much does the swing
plane change, the setup, the backswing, etc.? Well, let's take an in depth
look at exactly those types of questions. Below I have multiple screenshots
of me hitting a draw on the left and a fade on the right. With the lines drawn,
you can see the exact adjustments I make in detail to allow me to control
the ball in either direction.
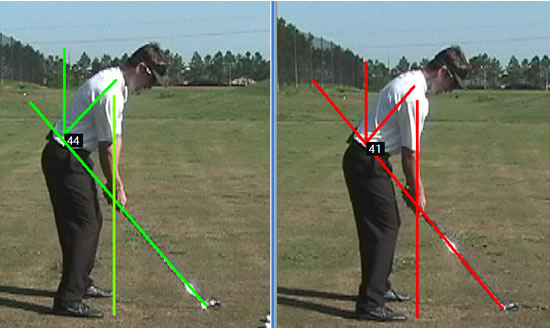
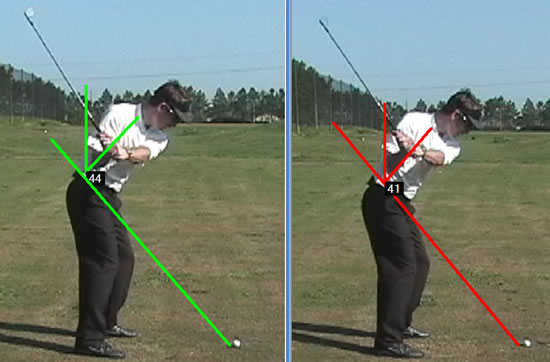
1. Address Changes
Let's start with the address position. At address, the only differences are
that my feet and shoulders are slightly more closed on the left (draw swing)
than on the right. In the picture on the right, you can see that my shoulders
are slightly left of my target, you can tell this by the fact that you can't
see my left shoulder at all, and in the draw swing you can slightly see my
left shoulder and my left foot is ahead of my right. You will alose note that
my spine angle is slightly more upright in the swing where I am hitting a
cut. This is a very subtle but important observation. This simple change of
only 3 degrees slightly changes the swing path of the club to be a fraction
more upright, which will allow me to slightly cut across the ball imparting
a cut spin. When hitting a draw, I want my swing to be slightly more around
to naturally come at the ball slightly more from the inside. I don't want
to try and manipulate the club during the swing, so I make these subtle changes
at address. These are very subtle changes.
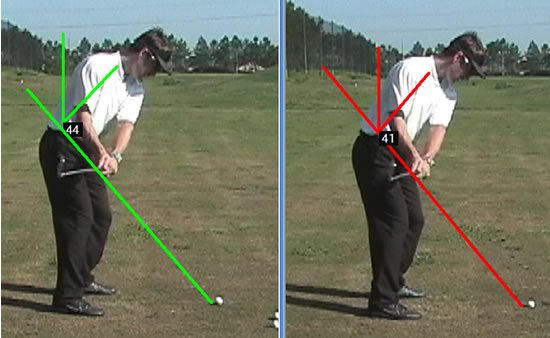
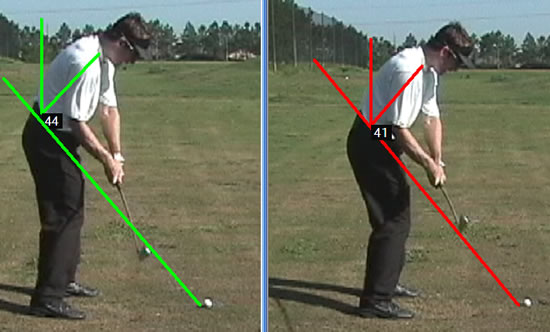
2. Club at 9 O'Clock
As the club gets parallel to the ground, you can see some differences, but
it is important to note that these differences all occur because of the changes
I made at address and nothing else. The only thing this is really worth noting
here is that it appears that in the draw swing that I have taken the club
back more inside. This is in fact not true, it only appears that way because
my address position is more closed. Everything else in the two swings has
stayed the same at this point.
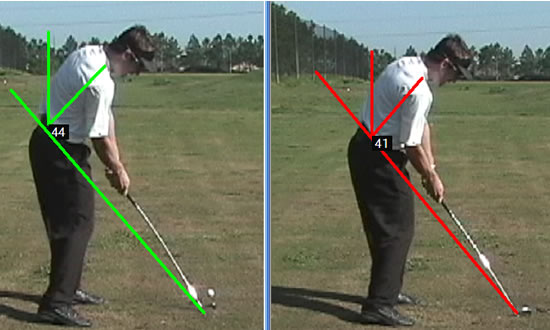
3. Halfway Back
At the halfway point, everything is identical.

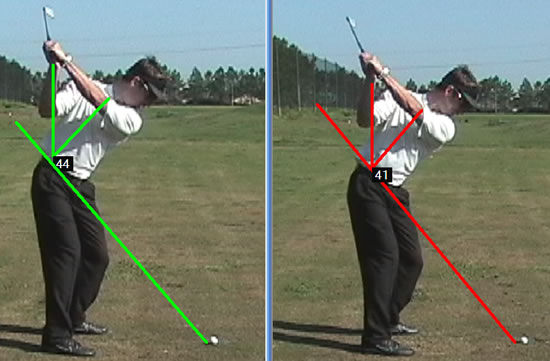
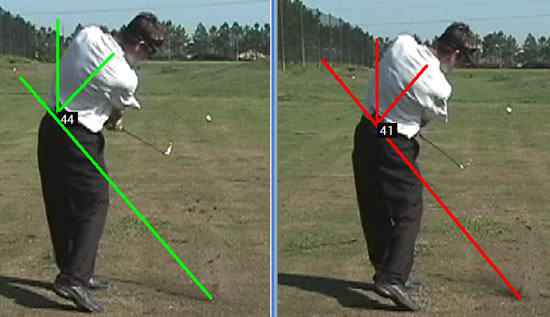
4. Top of the Swing
At the top of the swing, we can finally see the first actual difference in
the two swings. I don't mention this in the video segments because it's not
something one needs to consciously work on to hit either shot, but I point
out here as a reference for those who are seeking to understand the two shots
a bit more in depth. In the swing on the right, the club is a bit more laid
off than that of the swing on the left but only slightly. The difference is
that I have not set my wrists quite as much here because I want to make certain
the toe of the club doesn't release on the downswing. Setting my wrists more
puts the club in a position where the it will have a tendency to release more
and close through impact. The more your wrists cock the more they will want
to release, so I hold off just a touch to ensure I can keep the clubface open
through impact. Keep in mind that this, too, is very subtle. It appears to
be more than it really is because of my alignment changes from address.
5. Halfway Down
As I start the club down, again, there are very few noticable differences
in the two swings. The less I change my swing and manipulate the club, the
more consistent I can be, so I carry that same philosophy into working the
ball in both directions. I've let my setup changes dictate the swing thus
far and I just keep the two mental images I started with throughout the swing.
For the draw I am wanting to start gently letting the club release at this
point and for the fade I'm working to keep the clubface more open. You can
see the angles of the clubfaces are slightly different at this point, one
more closed, the other has stayed more open as I set it address. The angle
I set at address I want to maintain throughout the swing.
6. Nearing Impact
As I near impact, again, everything is essentially the same in my swing, the
only differences are those that occur because of the changes I have made at
setup. In the draw swing, I am coming in slightly under the original shaft
plane I had at address. This is because of my slightly closed stance. In the
fade swing, I'm swinging the club exactly on the original shaft plane and
am keeping the club slightly more open.
7. Impact
The positions are basically identical but these two shots couldn't be more
different. Hopefully this begins to illustrate how easy it is to work the
ball in both directions. I have made only a few subtle changes in my setup
and swing but can easily work the ball in both directions without making manipulations
of my swing path, swing plane and club with my arms and hands. At this point,
my imagery of holding the clubface open or releasing the club begins to come
into play and this is the first time that you'll start to see any real differences
in the two swings.
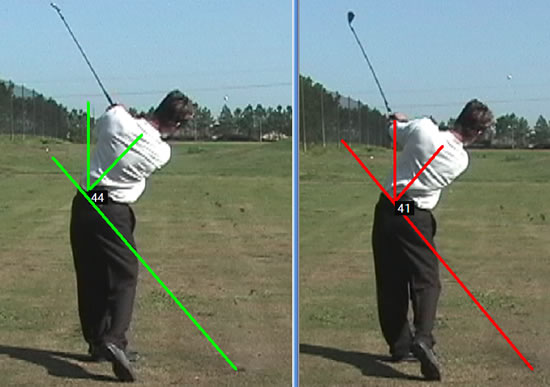
8. After Impact
As the club works past impact, you can see only two notable differences. In
the draw swing, I have let the clubhead release through impact and you can
see that the club is in a slightly more toe up position. In the fade swing,
I have held onto the club to keep it from releaseing and, thus, it is more
open past impact. The only other noticable difference is that the fade swing
appears to have worked more immediately inside as you can't see my hands at
this point. This is again, only because of the setup change I made at address.
The final thing to note is that the trajectory of the fade swing is, of course,
higher as I have maintained the loft of the club through impact, so it will
come out on a higher trajectory.
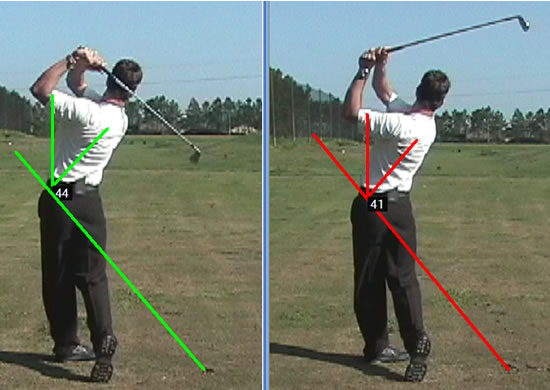
9. Follow Through
Here you can see how much I've allowed the club to release in the draw swing
compared to how much I've kept it from releasing when hitting the fade and
you can see how much lower of a trajectory the ball on the left is coming
out on.
10. Finish
Here is where the most obvious differences can be seen. My finish is much
shorter and held off when hitting the fade because, again, I'm working to
keep the toe of the club from turning over through impact. In the draw swing,
I have made a full release and let the toe of the club release through the
shot. This is almost the same position that I would finish in with a normal
swing, except the club wouldn't be quite as released as it is here and the
shaft of the club would look more like it is going directly through the middle
of my ears rather than diagonally across them.
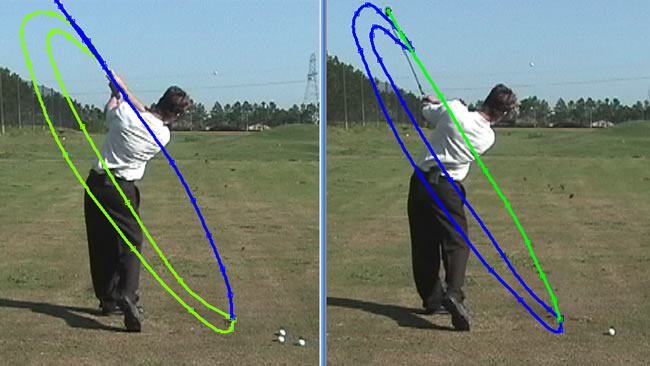
11. Swing Path
These side by side screen shots below show how much the swing path has remained
the same throughout the two swings. They only appear different because of
the setup changes. These photos also give a nice visual of how the club naturally
works in an arc throughout the entire swing. The swing path very much works
on a circle and this shows that perfectly.
|
|
|
| ||||||||
